
REDI-SET-GO™ Installation
REDI-SET-GO™
INSTALL CODE 1
SNAP TAB BACKING PLATE REMOVAL
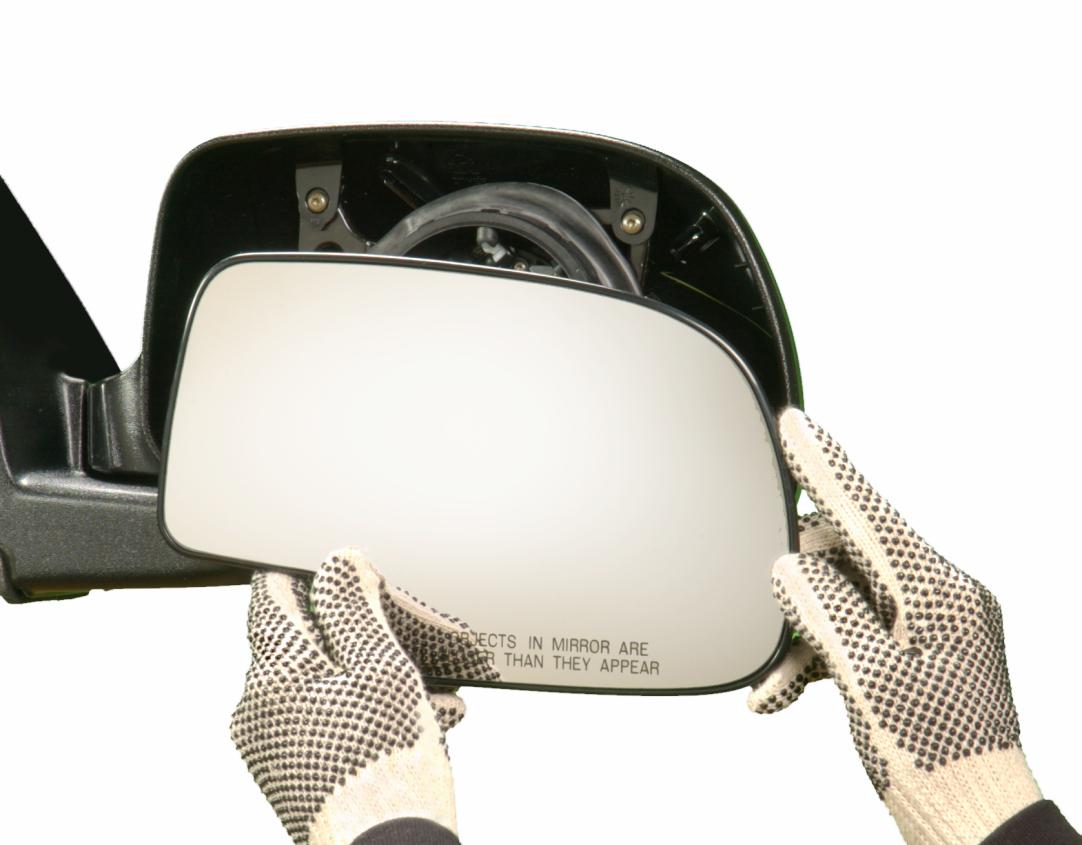
STEP 1: REMOVE MIRROR & BACKING PLATE
Manually pivot mirror downward by applying pressure to the lower portion of your mirror. Insert a screwdriver above mirror behind backing plate and carefully pry off backing plate snap tabs from the motor head.
TIP: Place a towel on edge of mirror head when prying off backing plate to prevent damage or scratching.
STEP 2: DETACH WIRES
If your mirror is a heated variant, disconnect wires from your mirror’s heating element. If applicable, auto dimming wires may have to be disconnected or clipped and capped.
NOTE: Burco® mirror replacements do not auto dim.
STEP 3: RECONNECT WIRES & TEST
If your mirror is a heated/signal variant, reconnect heating wires to Redi-Set-Go™ mirror's terminal leads. Test functionalities before proceeding to the next step.
STEP 4: INSTALL REDI-SET-GO™
Align motor mount snap tabs with motor. Apply gentle even pressure until motor mount snaps onto motor head.
STEP 5: CLEAN UP
Clean your installed Redi-Set-Go® mirror replacement with glass cleaner.
REDI-SET-GO™
INSTALL CODE 2
SLIDE TAB BACKING PLATE REMOVAL
STEP 1: REMOVE MIRROR & BACKING PLATE
Insert a screwdriver below your mirror and carefully slide tab locks off of tab lock guides by lifting/prying upward.
TIP: Lift/pry upward. Do not pry outward.
TIP: Place a towel on edge of mirror head when prying up to prevent damage or scratching.
STEP 2: DETACH WIRES
If your mirror is a heated variant, disconnect wires from your mirror’s heating element. If applicable, auto dimming wires may have to be disconnected or clipped and capped.
NOTE: Burco® mirror replacements do not auto dim.
STEP 3: RECONNECT WIRES & TEST
If your mirror is a heated/signal variant, reconnect heating wires to Redi-Set-Go™ mirror's terminal leads. Test functionalities before proceeding to the next step.
STEP 4: INSTALL REDI-SET-GO™
Vertically align your Redi-Set-Go™ mirror replacement toward the top of the mirror head. Apply gentle downward pressure and slide tab locks onto tab lock guides.
TIP: For more clearance, pivot motor head downward.
STEP 5: CLEAN UP
Clean your installed Redi-Set-Go® mirror replacement with glass cleaner.
REDI-SET-GO™
INSTALL CODE 3
UPPER HOOK LOCK BACKING PLATE REMOVAL
STEP 1: REMOVE MIRROR & BACKING PLATE
Manually pivot mirror and backing plate upward by applying pressure on the upper portion of your mirror. Insert a screwdriver below your mirror and backing plate and carefully pry lower snap locks off the snap lock guides. Once lower snap locks pop off, pull down/out to release the upper hook locks from the hook lock guides.
TIP: Place a towel on edge of mirror head when prying off lower snap locks to prevent damage or scratching
STEP 2: DETACH WIRES
If your mirror is a heated variant, disconnect wires from your mirror’s heating element. If applicable, auto dimming wires may have to be disconnected or clipped and capped.
NOTE: Burco® mirror replacements do not auto dim.
STEP 3: RECONNECT WIRES & TEST
If your mirror is a heated/signal variant, reconnect heating wires to Redi-Set-Go™ mirror's terminal leads. Test functionalities before proceeding to the next step.
STEP 4: INSTALL REDI-SET-GO™
Insert upper hook locks into the hook lock guides. Next, apply gentle pressure and snap lower snap locks into snap lock guides.
TIP: Be sure upper hook locks are fully seated before snapping lower snap locks into place.
STEP 5: CLEAN UP
Clean your installed Redi-Set-Go® mirror replacement with glass cleaner.
REDI-SET-GO™
INSTALL CODE 4
LOWER HOOK LOCK BACKING PLATE REMOVAL
STEP 1: REMOVE MIRROR & BACKING PLATE
Manually pivot mirror and backing plate downward by applying pressure to the lower portion of your mirror. Insert a screwdriver above your mirror and backing plate and carefully pry upper snap locks out of the snap lock guides. After the upper snap locks pop off, pull up/out to release lower hook locks from the hook lock guides.
TIP: Place a towel on edge of mirror head when prying upper snap locks off to prevent damage or scratching.
STEP 2: DETACH WIRES
If your mirror is a heated variant, disconnect wires from your mirror’s heating element. If applicable, auto dimming wires may have to be disconnected or clipped and capped.
NOTE: Burco® mirror replacements do not auto dim.
STEP 3: RECONNECT WIRES & TEST
If your mirror is a heated/signal variant, reconnect heating wires to Redi-Set-Go™ mirror's terminal leads. Test functionalities before proceeding to the next step.
STEP 4: INSTALL REDI-SET-GO™
Insert lower hook locks into the hook lock guides. Next, apply gentle pressure and snap upper snap locks into snap lock guides.
TIP: Be sure lower hook locks are fully seated before snapping upper snap locks into place.
STEP 5: CLEAN UP
Clean your installed Redi-Set-Go® mirror replacement with glass cleaner.
REDI-SET-GO™
INSTALL CODE 5
BALL PIVOT BACKING PLATE REMOVAL
STEP 1: REMOVE MIRROR & BACKING PLATE
Manually pivot mirror by applying pressure to the lower and side portions of your mirror. Insert a screwdriver behind backing plate and carefully pry off all pivots from their sockets using care not to damage the pins.
TIP: Place a towel on edge of mirror head when prying off pivots to prevent damage or scratching.
STEP 2: DETACH WIRES
If your mirror is a heated variant, disconnect wires from your mirror’s heating element. If applicable, auto dimming wires may have to be disconnected or clipped and capped.
NOTE: Burco® mirror replacements do not auto dim.
STEP 3: RECONNECT WIRES & TEST
If your mirror is a heated/signal variant, reconnect heating wires to Redi-Set-Go™ mirror's terminal leads. Test functionalities before proceeding to the next step.
STEP 4: RELOCATE ACTUATOR PIVOT PINS TO REDI-SET-GO™
Twist each actuator pivot pin counter clockwise to remove them from the motor head. Snap each actuator pivot pin into its corresponding socket on your Redi-Set-Go™ mirror ensuring that each pin's tabs are properly aligned with the vertical and horizontal socket cutouts.
STEP 5: INSTALL REDI-SET-GO™
With the actuator pins set in Redi-Set-Go™ sockets, place Redi-Set-Go™ into the mirror head while setting each pin into its original location. Once actuator pivot pins are set in place, snap main ball pivot into main socket by applying gentle, even pressure to the center of your Redi-Set-Go™ mirror.
STEP 6: CLEAN UP
To test mobility, tilt mirror side/side & up/down. Clean your installed Redi-Set-Go™ mirror with glass cleaner.
TOOLS NEEDED FOR INSTALLATION
PUTTY KNIFE

Use a 1.25" or 1.5" metal putty knife to remove broken mirror glass.
FLAT HEAD SCREWDRIVER

Use a flat head screwdriver to remove broken mirror glass.
TOWEL

Use a towel so prying does not scratch paint. Can also be used for clean up.
SILICONE OR URETHANE

Silicone or urethanes may be used with gasket fit mirrors for a secure hold.
RUBBING ALCOHOL

Rubbing alcohol can be used to prep the backing plate for proper adhesion.
RUBBER MALLET

When installing a gasket fit mirror, use a rubber mallet to gently tap gasket into place.
STEPS FOR SAFETY
SAFETY GLASSES

Safety glasses are needed to protect eyes against flying glass or debris.
CUT-RESISTANT GLOVES

Cut-resistant gloves must be worn when handling broken glass.
LONG SLEEVES

A long-sleeved shirt is recommended.
PROPER VENTILATION

When working with adhesives and cleaners, proper ventilation is recommended.